TTL to Arduino integration doesn’t have to be complicated.
If you’re connecting a laser Abstandssensor with TTL UART output to an Arduino board, this guide walks you through the exact wiring, baud rate settings, and Arduino code needed to get reliable distance data—without guesswork or trial-and-error.
You’ll learn how TTL communication works on Arduino, how to wire TX and RX correctly, and how to read and parse distance data using a simple UART example. This tutorial is ideal for robotics, automation, and embedded measurement projects where fast and stable distance sensing is required.
1. How Arduino Communicates with TTL Laser Distance Sensors
Die meisten Laserdistanz sensors designed for embedded systems output measurement data via TTL-level UART (TX/RX).
Arduino boards—such as Arduino Uno, Nano, or Mega—support UART communication through:
- Hardware Serial (Serial, Serial1, etc.)
- SoftwareSerial (for flexible pin assignment)
A typical TTL Laser-Distanz-Sensor:
- Continuously outputs distance frames
- Uses a fixed baud rate (commonly 9,600 or 115,200 bps)
- Sends binary or ASCII-encoded measurement data
Because both Arduino and TTL sensors operate at logic-level voltage, they can communicate directly when voltage levels are compatible.
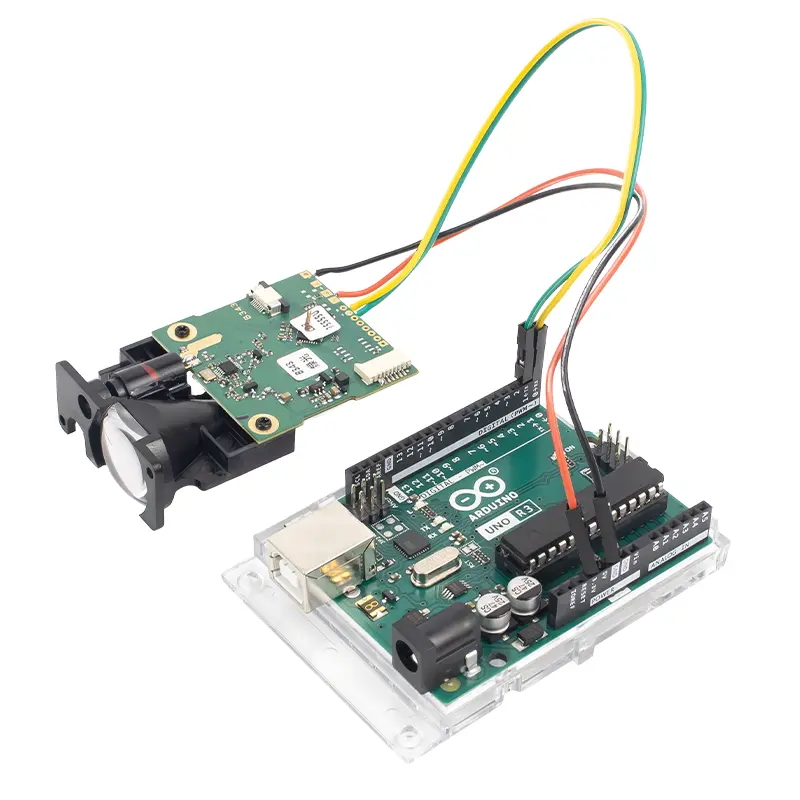
2. Wiring a Laser Distance Sensor TTL to Arduino
Basic UART Wiring Logic
The connection follows standard UART rules:
| Laser Sensor Pin | Arduino Pin |
|---|
| VCC | 3.3V or 5V* |
| GND | GND |
| TX | RX (D8*) |
| RX | TX (D9*) |
*Pin numbers may vary depending on whether you use Hardware Serial or SoftwareSerial.
Typical Notes
- TX → RX, RX → TX (cross connection)
- Use SoftwareSerial if the main USB serial is needed for debugging
- Some sensors include an enable or power-control pin, which can be tied to VCC or controlled via a GPIO
3. Arduino Code Example: Reading Distance Data via TTL UART
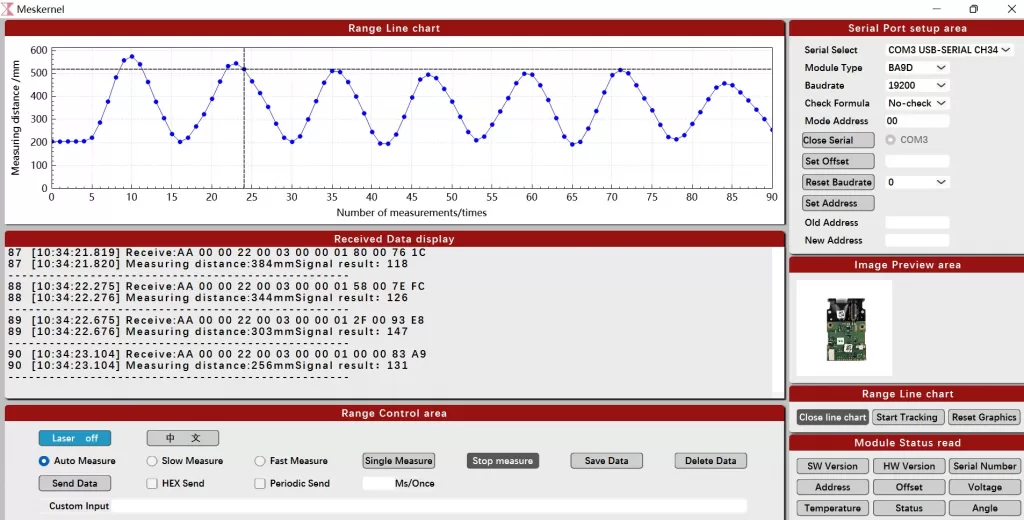
Below is a simplified Arduino example showing how to receive distance data from a TTL laser distance sensor.
#include <SoftwareSerial.h>// Define RX and TX pins
SoftwareSerial laserSerial(8, 9); // RX, TXvoid setup() {
  Serial.begin(115200);          // USB serial monitor
  laserSerial.begin(115200);     // Sensor baud rate
  Serial.println("Laser Distance Sensor Initialized");
}void loop() {
  if (laserSerial.available()) {
    uint8_t data = laserSerial.read();
    Serial.print(data, HEX);
    Serial.print(" ");
  }
}
What This Code Does
- Initializes a UART connection to the laser sensor
- Continuously reads incoming data bytes
- Outputs raw frames to the serial monitor for protocol analysis
In real applications, you would parse the sensor’s protocol to extract distance values (for example, converting bytes into millimeters).
4. Common Configuration Pitfalls (and How to Avoid Them)
1️⃣ Voltage Level Mismatch
- Confirm whether the sensor requires 3.3V or 5V
- Some sensors tolerate both; others do not
2️⃣ Incorrect Baud Rate
- Baud rate must exactly match the sensor’s default setting
- Common values:
9600, 19200, 115200
3️⃣ Serial Port Conflicts
- Avoid using
Serial for both sensor data and debugging
- Use SoftwareSerial or secondary hardware serial ports when possible
4️⃣ Poor Wiring or Loose Connections
- UART communication is sensitive to unstable connections
- Keep wires short in noisy environments
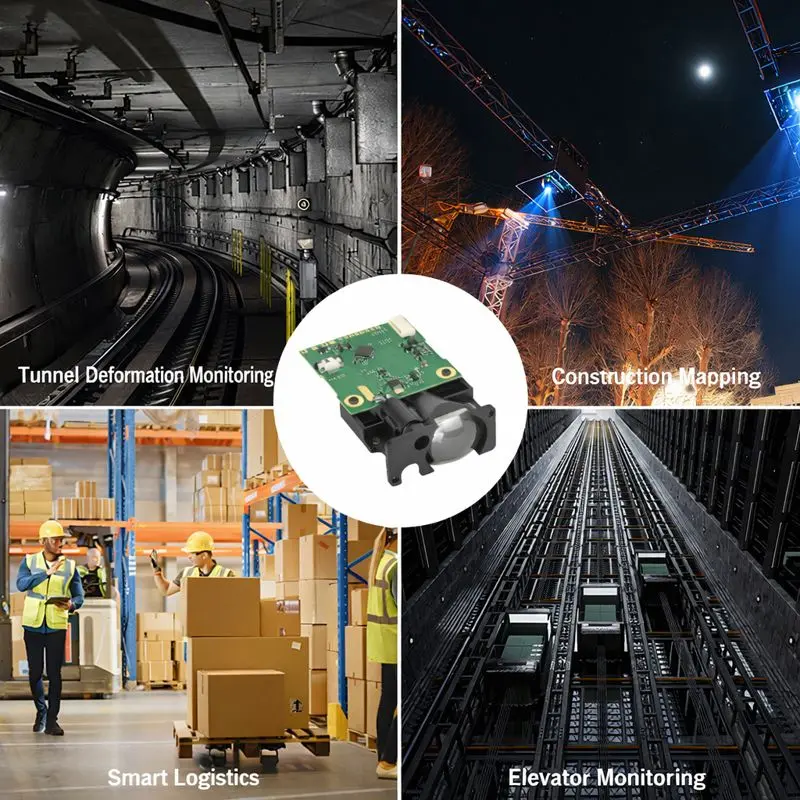
5. Example Applications Using Arduino + TTL Laser Distance Sensors
TTL-Laser-Abstandssensoren integrated with Arduino are commonly used in:
- 🤖 Mobile robot obstacle avoidance
- 📏 Distance data logging systems
- 🏭 Industrial position Erkennung
- 🚪 Access control and intrusion detection
- 📡 Smart monitoring and IoT measurement nodes
Because the interface is simple and resource-efficient, TTL sensors are ideal for low-cost prototypes and scalable embedded designs.
6. Why TTL Laser Distance Sensors Are Popular in Embedded Projects
From a system design perspective, TTL sensors offer:
- Einfache Verdrahtung
- Geringe Latenzzeit
- No complex drivers
- Easy debugging via serial monitor
- Excellent compatibility with Arduino ecosystems
This makes them a practical choice for both early-stage development and production systems.

Abschließende Überlegungen
Connecting a laser distance sensor TTL to Arduino is straightforward when you understand:
- UART communication principles
- Proper TX/RX wiring
- Baud rate configuration
- Basic serial data parsing
With these fundamentals in place, Arduino becomes a powerful platform for building reliable laser-based Abstandsmessung Systeme.
FAQ: Laser Distance Sensor TTL to Arduino Integration
What is a TTL laser distance sensor and how does it work with Arduino?
A TTL laser distance sensor measures distance using a laser emitter and outputs results via TTL-level UART communication. Arduino can read this data through TX and RX pins using hardware or software serial, making TTL sensors easy to integrate into embedded and robotics projects.
How do I connect a laser distance sensor TTL to Arduino?
To connect a TTL laser distance sensor to Arduino, wire the sensor’s TX pin to Arduino RX, RX to TX, GND to GND, and VCC to 3.3V or 5V as specified. Then configure the correct baud rate in Arduino code to read distance data.
What baud rate should I use for a laser distance sensor TTL on Arduino?
Die meisten Laser-Distanz-Sensoren using TTL UART operate at 9,600 or 115,200 baud. The baud rate configured in Arduino must exactly match the sensor’s default setting, otherwise no valid distance data will be received.
Can Arduino Uno read TTL laser distance sensor data directly?
Yes, Arduino Uno can read TTL laser distance sensor data directly using UART communication. Developers commonly use SoftwareSerial on digital pins to avoid conflicts with the USB serial port used for debugging.
Do I need a level shifter for a TTL laser distance sensor with Arduino?
A level shifter is not required if both Arduino and the laser distance sensor operate at compatible TTL voltage levels (3.3V or 5V). Always check the sensor’s voltage specification before powering or connecting signal lines.
Why is my Arduino not receiving distance data from the laser sensor?
If Arduino is not receiving data, common causes include incorrect TX/RX wiring, mismatched baud rate, unstable power supply, or loose connections. Verifying serial settings and using a serial monitor to view raw data usually resolves the issue.
How do I parse distance data from a TTL laser distance sensor?
Distance data from a TTL laser distance sensor is usually transmitted as a fixed-length binary or ASCII frame. Arduino code must read incoming bytes, identify frame headers, and convert the data field into millimeters or centimeters according to the sensor protocol.
Can I use multiple laser distance sensors with one Arduino?
Yes, multiple TTL-Laser-Abstandssensoren can be used with one Arduino by assigning separate serial ports or switching sensors using multiplexers. Boards with multiple hardware serial ports simplify multi-sensor integration.
What are common applications of Arduino with TTL laser distance sensors?
Arduino combined with TTL laser distance sensors is commonly used in mobile robot obstacle avoidance, distance data logging, industrial positioning, access control systems, and smart monitoring devices requiring real-time distance measurement.
Is TTL better than I2C or RS485 for laser distance sensors?
TTL UART is simpler and easier to debug than I2C or RS485, making it ideal for Arduino-based prototypes and short-distance communication. For long cables or noisy environments, RS485 may offer better reliability.
Compare different Meskernel laser distance sensor models in video demos