Introduction
Whether you’re building an autonomous robot or designing a precise measurement system, integrating a reliable Arduino distance sensors is essential. In this guide, we’ll walk you through how to connect a UART-compatible laser rangefinder sensor to an Arduino UNO. This powerful combination allows you to accurately measure distances up to several meters using laser time-of-flight (ToF) technology.
👉 Related Product:
Laser Rangefinder Sensor – Buy Now
Why Use a Laser-Based Arduino Distance Sensors?
Laser-based sensors offer higher precision and longer range compared to ultrasonic or infrared sensors. They are ideal for:
Wiring the Laser Rangefinder to Arduino UNO
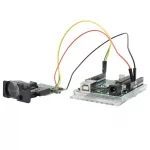
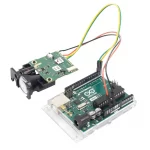
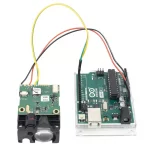
Below is a detailed wiring guide based on the sensor and Arduino setup shown in the image:
Laser Rangefinder module connected to Arduino UNO via UART
Pin Connection Table:
| Sensor Pin Color | Function | Arduino Pin |
|---|
| Black | GND | GND |
| Red | 3.3V Power Input | 3.3V |
| Yellow | RX (Receive) | TX (D1) |
| Green | TX (Transmit) | RX (D0) |
⚠️ Important: The sensor uses 3.3V logic, so ensure that your Arduino board supports 3.3V UART or use a voltage divider to avoid damaging the module.
Sample Code to Read Distance Data
Here’s a basic Arduino sketch to test communication:
void setup() {
  Serial.begin(9600); // Communication with PC
  Serial1.begin(115200); // Sensor default baudrate
}

void loop() {
  while (Serial1.available()) {
    Serial.write(Serial1.read());
  }
}
💡 Tip: If your Arduino UNO doesn’t support Serial1, you can use the SoftwareSerial library for virtual serial communication.
Troublesighting Tips
- No data received? Double-check RX/TX lines (they must be crossed: Arduino TX to Sensor RX, and vice versa).
- Garbled output? Make sure baudrate matches the sensor’s default (often 115200).
- Voltage mismatch? Consider using a logic level shifter if you’re powering the sensor with 3.3V but using 5V logic on Arduino.
Application Scenarios
This kind of setup can be easily scaled for:
- Collision Avoidance in Robotics
- Terrain Mapping via Drone
- Smart Inventory Systems
- DIY Measurement Tools
Explore more use cases in this introductory paper on laser-based sensors.
 Hunting Rangefinders
 laser measure sensor
 Logistics Warehousing
Where to Buy?
Check out our high-performance Laser Rangefinder Sensor – designed for Arduino and other embedded platforms. Get technical specs, manuals, and sample code directly on the product page.
Conclusion
Using an Arduino distance sensors with UART communication is a reliable way to add precise distance measurement to your project. Follow the wiring guide, upload the sketch, and start collecting accurate distance data in no time. With the help of this tutorial, you’re now one step closer to building a smarter, more responsive device.
📌 Bookmark this guide, and don’t forget to share it with fellow makers and engineers!
Frequently Asked Questions (FAQ) about Arduino Distance Sensors
✅ What is Arduino distance sensors?
Arduino distance sensors is a module that measures the distance between the sensor and an object, and sends that data to an Arduino board for processing. Common types include ultrasonic sensors, infrared sensors, and laser distance sensors (like the one shown in this guide). Laser-based sensors offer the best range and accuracy.
✅ Which distance sensor is best for Arduino?
It depends on your application. For long-range and high-precision tasks, a laser rangefinder distance sensor is best. For simple and low-cost applications, HC-SR04 ultrasonic sensors may suffice. For most industrial or robotics projects, laser-based Arduino distance sensors provide the most reliable performance.
✅ How do I connect a laser distance sensor to Arduino?
To connect a laser distance sensor to Arduino, follow these steps:
Connect GND to Arduino GND.
Connect 3.3V power to the 3.3V pin on the Arduino.
Connect the TX pin of the sensor to the RX pin on Arduino.
Connect the RX pin of the sensor to the TX pin on Arduino.
Make sure the sensor voltage and logic levels are compatible with the Arduino board.
✅ Can Arduino read distance sensor data via UART?
Yes, Arduino can read distance sensor data via UART by using either the built-in serial port (like Serial1 on Arduino Mega) or SoftwareSerial on boards like Arduino UNO. The sensor typically transmits distance measurements as serial data, which Arduino can capture and process.
✅ What are some applications of Arduino distance sensors?
Here are some popular applications of Arduino distance sensors:
Obstacle avoidance for robots and drones
Level monitoring in tanks or silos
Height measurement for smart agriculture
Object detection in automation systems
DIY rangefinder tools and measuring instruments
✅ What is the range of a laser-based Arduino distance sensor?
The range of a laser-based Arduino distance sensors can vary from a few centimeters up to 40 meters or more, depending on the module’s specifications. The sensor featured in this article supports long-distance measurements with high precision.
You can find detailed specs here:
👉 Laser Rangefinder Sensor – View Details
✅ Do I need a level shifter for 3.3V laser distance sensors?
Yes — if your Arduino board uses 5V logic, and your distance sensor operates at 3.3V, a logic level shifter or a voltage divider is recommended to protect the sensor’s RX pin. Many Arduino-compatible sensors include level shifting onboard, but it’s important to check the datasheet.