If you want to learn how to connect a laser Abstandssensor to Arduino, this step-by-step guide will show you exactly how to wire and configure the LDJ industrieller Laser-Abstandssensor. This tutorial covers UART wiring, I²C wiring notes, voltage-level considerations, Arduino UNO/Mega/ESP32 differences, sample code, and troubleshooting tips.
By the end of this tutorial, you will fully understand the correct Arduino Laserdistanz sensor connection and complete wiring process for long-range laser modules.

1. What You Need
To set up the LDJ with Arduino, prepare:
- Laser-Abstandssensor LDJ
- Arduino UNO / Arduino Mega / ESP32
- Überbrückungsdrähte
- 3.3V ↔ 5V level shifter (required for UNO/Mega)
- USB cable
- Optional: breadboard
Key Electrical Features of LDJ
- UART (TTL 3.3V) Kommunikation
- I²C with multi-address support
- 3.3V I/O logic
- EN / PWREN_z enable pins
- Pulse-based long-range Lasermessung
Because the sensor’s UART interface is 3.3V, level shifting is required on 5V Arduino boards.
2. UART vs I²C for LDJ
The LDJ supports two communication interfaces:
UART (Recommended)
- Einfache Verdrahtung
- Long-distance stable transmission
- Default working mode
- Best for real-time long-range measurements
I²C
- Supports address range 0x00–0x7E
- Good for multi-sensor systems
- Requires additional register controls
For most Arduino users, UART is the easiest and most reliable connection method.
3. Basic Wiring: VCC / GND / RX / TX
If your goal is to understand how to wire a laser sensor to Arduino, start with the standard UART pin mapping:
| LDJ Pin | Funktion | Arduino Pin |
|---|
| VCC | Power input | 5V or 3.3V |
| GND | Boden | GND |
| TXD | Sensor → Arduino data | RX |
| RXD | Arduino → Sensor data | TX (3.3V required) |
| EN / PWREN_z | Module enable | 3.3V or GPIO HIGH |

Das ist wichtig:
LDJ uses 3.3V UART logic.
- Arduino UNO/Mega TX (5V) → must be level-shifted
- ESP32 (3.3V) → can connect directly
This is the core requirement for a safe and stable Arduino Laser-Distanz-Sensor connection.
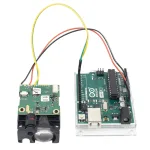
4. Wiring LDJ to Arduino UNO
Because the UNO uses a 5V logic level and only one hardware serial port (connected to USB), we will use SoftwareSerial.
LDJ → Arduino UNO Wiring Diagram
| LDJ | Arduino UNO |
|---|
| VCC | 5V |
| GND | GND |
| TXD | D8 (Software RX) |
| RXD | D9 (level-shifted) |
| EN/PWREN_z | 3.3V or D7 (HIGH) |
Voltage Level Conversion
Use a resistor divider for UNO TX → LDJ RXD:
This reduces 5V to safe 3.3V.
5. Wiring LDJ to Arduino Mega
Arduino Mega provides multiple hardware serial ports and is recommended for high-speed, stable communication.
Wiring Table (Hardware Serial 1)
| LDJ | Arduino Mega |
|---|
| VCC | 5V |
| GND | GND |
| TXD | RX1 (Pin 19) |
| RXD | TX1 (Pin 18, level-shifted) |
| EN/PWREN_z | 3.3V or a GPIO pin |
Mega is ideal for high baud rate signals and long-range sensors.
6. Wiring LDJ to ESP32 (Best Compatibility)
ESP32 runs at 3.3V logic, making it the best match for LDJ
LDJ → ESP32 Wiring
| LDJ | ESP32 |
|---|
| VCC | 5V or 3.3V |
| GND | GND |
| TXD | GPIO16 (RX) |
| RXD | GPIO17 (TX) |
| EN/PWREN_z | 3.3V or HIGH |
No level shifting needed.
This is the most stable method of wiring a laser sensor to Arduino-compatible boards.
7. Arduino Code Example for LDJ (UART)
#include <HardwareSerial.h>

HardwareSerial LaserSerial(1);

void setup() {
  Serial.begin(115200);

  // Example for ESP32: RX=16, TX=17
  LaserSerial.begin(115200, SERIAL_8N1, 16, 17);

  Serial.println("LDJ Laser Distance Sensor Initialized.");
}

void loop() {
  if (LaserSerial.available()) {
    uint8_t b = LaserSerial.read();
    Serial.print("Raw Byte: ");
    Serial.println(b);
  }
}
8. I²C Wiring (Optional)
LDJ provides full I²C support with adjustable addresses from 0x00 to 0x7E.
I²C Pin Mapping
| LDJ Signal | Funktion | Arduino UNO | Mega | ESP32 |
|---|
| SDA | Data | A4 | 20 | GPIO21 |
| SCL | Clock | A5 | 21 | GPIO22 |
| EN/PWREN_z | Aktivieren Sie | 3.3V | 3.3V | 3.3V |
UART is recommended for beginners,
but advanced users may access additional I²C registers depending on your LDJ configuration.
9. Troubleshooting LDJ Arduino Connection
1. No data output
- TXD and RXD reversed
→ Swap TX/RX
2. Garbled characters
- Wrong baud rate
→ Use 115200 bps
3. Sensor not responding
- 5V signal applied to 3.3V RX
→ Level shifting required
4. UNO communication unstable
- SoftwareSerial has limitations
→ Use Arduino Mega or ESP32
5. Poor outdoor distance
- Low reflectivity or direct sunlight
→ Use reflective target plate
These solutions cover all common issues in wiring Laser-Sensoren to Arduino.
10. Why Choose LDJ for Arduino Projects
The LDJ is an industrial-grade Laser-Distanz-Modul designed for high-precision, long-range measurement.
LDJ Features
- Long-range measurement capability
- UART (TTL 3.3V) + I²C dual interface
- Multi-address I²C
- EN/PWREN_z enable pins
- Puls TOF Messung
- High-stability industrial design
- Ideal for Arduino, Mega, and ESP32
- Suitable for robotics, automation, AGV, Vermessung, and positioning
LDJ is significantly more accurate and stable than consumer-grade ToF modules.
Schlussfolgerung
Now you fully understand how to connect a laser sensor to Arduino, how to complete the correct Arduino laser distance sensor connection, and how to safely perform wiring a laser sensor to Arduino using UART or I²C.
With the correct wiring method and 3.3V level-safe communication, the LDJ delivers reliable long-range performance on Arduino UNO, Mega, and ESP32.
For more advanced instructions—such as distance decoding, filtering, or multi-sensor setups—additional guides can be provided.
FAQ for How to Connect a Laser Distance Sensor to Arduino
-
How do I connect the LDJ laser distance sensor to Arduino?
You can connect the LDJ arduino laser sensor to Arduino using the UART interface by wiring VCC to 5V/3.3V, GND to GND, TXD to Arduino RX, and RXD to Arduino TX (with level shifting). This is the simplest method for completing an Arduino laser distance sensor connection.
-
Does the LDJ work with Arduino UNO?
Yes. The LDJ arduino laser sensor works with Arduino UNO through SoftwareSerial, but the UNO’s TX output must be converted from 5V to 3.3V. This ensures safe and correct laser sensor to Arduino wiring.
-
Can I connect the LDJ directly to ESP32?
Yes. ESP32 uses 3.3V logic, so you can wire the LDJ directly to its UART pins without a level shifter, making it one of the easiest platforms for how to connect laser sensor to Arduino-compatible boards.
-
What voltage does the LDJ laser sensor use?
The LDJ uses 3.3V I/O for RXD/TXD and accepts 3.3–5V for VCC. This is important for safe wiring laser sensor to Arduino because UNO/Mega require a level shifter.
-
What baud rate should I use for LDJ and Arduino?
The LDJ arduino laser sensor communicates at 115200 bps by default. Using a different baud rate will cause unreadable data or corrupted output in your Arduino laser distance sensor connection.
-
Does the LDJ support I²C?
Yes. The LDJ arduino laser sensor supports I²C communication with configurable slave addresses from 0x00 to 0x7E. It can be used for multi-sensor systems, though UART wiring is simpler for most Arduino users.
-
Why is my LDJ not sending distance data to Arduino?
The most common reasons are incorrect TX/RX wiring, wrong baud rate, or sending 5V signals to the sensor’s 3.3V RX pin. Fixing these issues usually restores proper Arduino laser distance sensor connection.
-
Can the LDJ be used outdoors?
Yes. The LDJ arduino laser sensor is an industrial-grade laser distance sensor and supports long-range measurement outdoors, but performance improves when using a reflective target under strong sunlight.
-
What is the best Arduino board for LDJ?
The ESP32 is the best option because it uses 3.3V logic and supports hardware UART. Arduino Mega is second-best due to its multiple dedicated serial ports.
-
How can I decode distance values from LDJ?
Die arduino laser sensor outputs data frames through UART or I²C. By parsing these bytes using Arduino code, you can extract the distance value in millimeters or meters. A custom decoder can be added on top of the sample code provided in this guide.
-
Can I use the LDJ for robotics or AGV systems?
Yes. The LDJ arduino laser sensor is suitable for AGV, warehouse automation, robotics Navigation, and outdoor measurement due to its long-range and stable pulse-based TOF measurement.
https://meskernel.net/connect-arduino-distance-sensors/